
Secure your agent: your app and your users
Make sure only your own app uses your agent, prove that it is your genuine app, and prove who each user is — which way to choose, set up per agent in the dashboard, rolled out report-only first with development builds that keep working, tested end to end, and traced check by check in the Security log.
Your app talks to its agent with the agent's publishable key. The key is public by design: it ships inside your app, and anyone who unpacks the app can read it. On its own it says which agent — not which app or which person. This page adds both, per agent, from Agent → Embed & Widgets → Install → Your app and your users:
| What it checks | What it stops | |
|---|---|---|
| Your apps | The app says which app it is: bundle ID and Team ID on iPhone, package name and signing certificate on Android | Your key copied into somebody else's app |
| Verified app | The app proves it: Apple App Attest on iPhone, Google Play Integrity on Android | A modified app, a script pretending to be your app |
| Verified users | The person your app names is proven by your own sign-in: a signed user ID from your server, or your sign-in provider's ID token | Someone claiming to be another user to read their memory, history or booked calls |
Each one is off until you turn it on, starts report-only — nothing is refused, you see what would be — and is enforced only after you confirm. Chats and calls follow the same rules, as do booking, memory, past conversations and device registration.
Requires SDK 0.14.4 on iOS, Android, Kotlin Multiplatform, Flutter and React Native (React Native also needs the calls package for app checks). Websites keep Allowed domains, and Verified users works on websites too.
What each level promises
- Your apps stops casual reuse, not a determined attacker. The app declares its identity; someone writing their own client can declare anything. Use it to keep your key out of other apps and to see who uses it.
- Verified app is a proof. App Attest proves the request comes from your signed iPhone app on a real Apple device; Play Integrity proves your Android app, as Google Play distributes it, on a device Google can vouch for. Neither detects a jailbroken iPhone, and a phone the user controls can always be inspected — so what you return to any app must still be safe for that user.
- Verified users is a proof of the person, checked on every new conversation. An unproven user still gets an answer once you enforce it — anonymously, with no memory, no past conversations, no booked calls and no rings.
- Websites: app checks apply to app requests. If the same agent also lists websites, a script can pretend to be one of them. For full protection give your app an agent of its own.
Which way should you prove users?
There are three ways, strongest first. Choose the first one that fits your app.
| Code on your server | Choose it when | |
|---|---|---|
| Server tokens | Yes: it mints a token for each signed-in user | The agent handles sensitive data, such as health or money |
| Your sign-in's ID token | None | Your sign-in already issues ID tokens |
| Your server signs the user ID (HMAC) | Yes: it signs each user's ID | Neither of the others works |
Server tokens are the strongest, and what we recommend for sensitive data such as health or money.
Your server already knows who signed in. It mints a short-lived Graine token for that user with your
secret API key, and your app passes it to the SDK (tokenProvider). Nothing your sign-in issued ever
leaves your systems, and once you enforce server tokens, the publishable key alone opens nothing. See
Server tokens.
Your sign-in's ID token needs no server code. Your app passes the ID token your sign-in already issues, and we check it against the public keys your sign-in publishes: its JWKS URL. One caution: if your own API also accepts that same ID token as a login, use one issued for Graine, with its own audience — a separate client ID in your sign-in, for example. Then the token your app hands us can't be replayed against your API. If your sign-in can't issue one, use server tokens.
Your server signs the user ID (HMAC) only if neither works. It proves users to one agent per app: each agent has its own secret, and your app gives the SDK one identity token for all its agents.
The ID token and the signed user ID are the two choices under Prove who the user is, below. Server tokens have a setting of their own: Embed & Widgets → Install → Server tokens.
Set it up
Open the agent → Embed & Widgets → Install, and press Set up under Your app and your users.
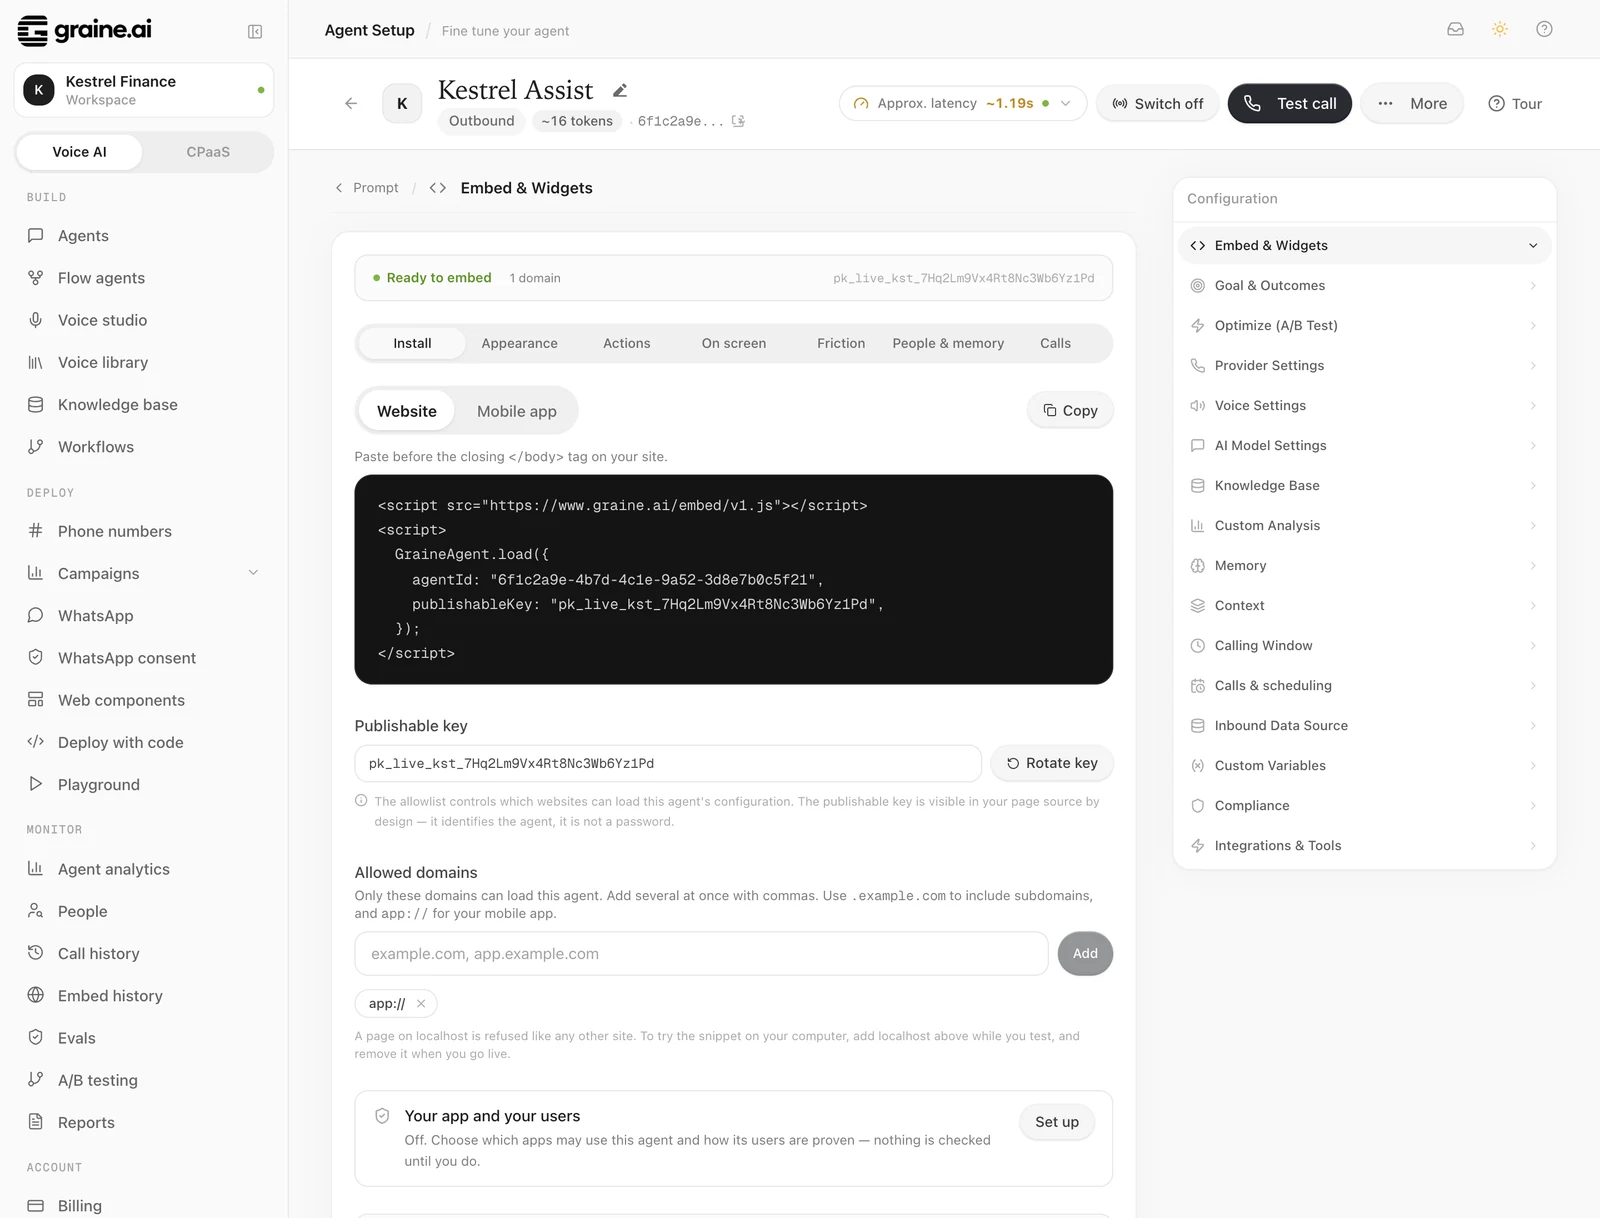
The setup has six steps, and each says where it stands.
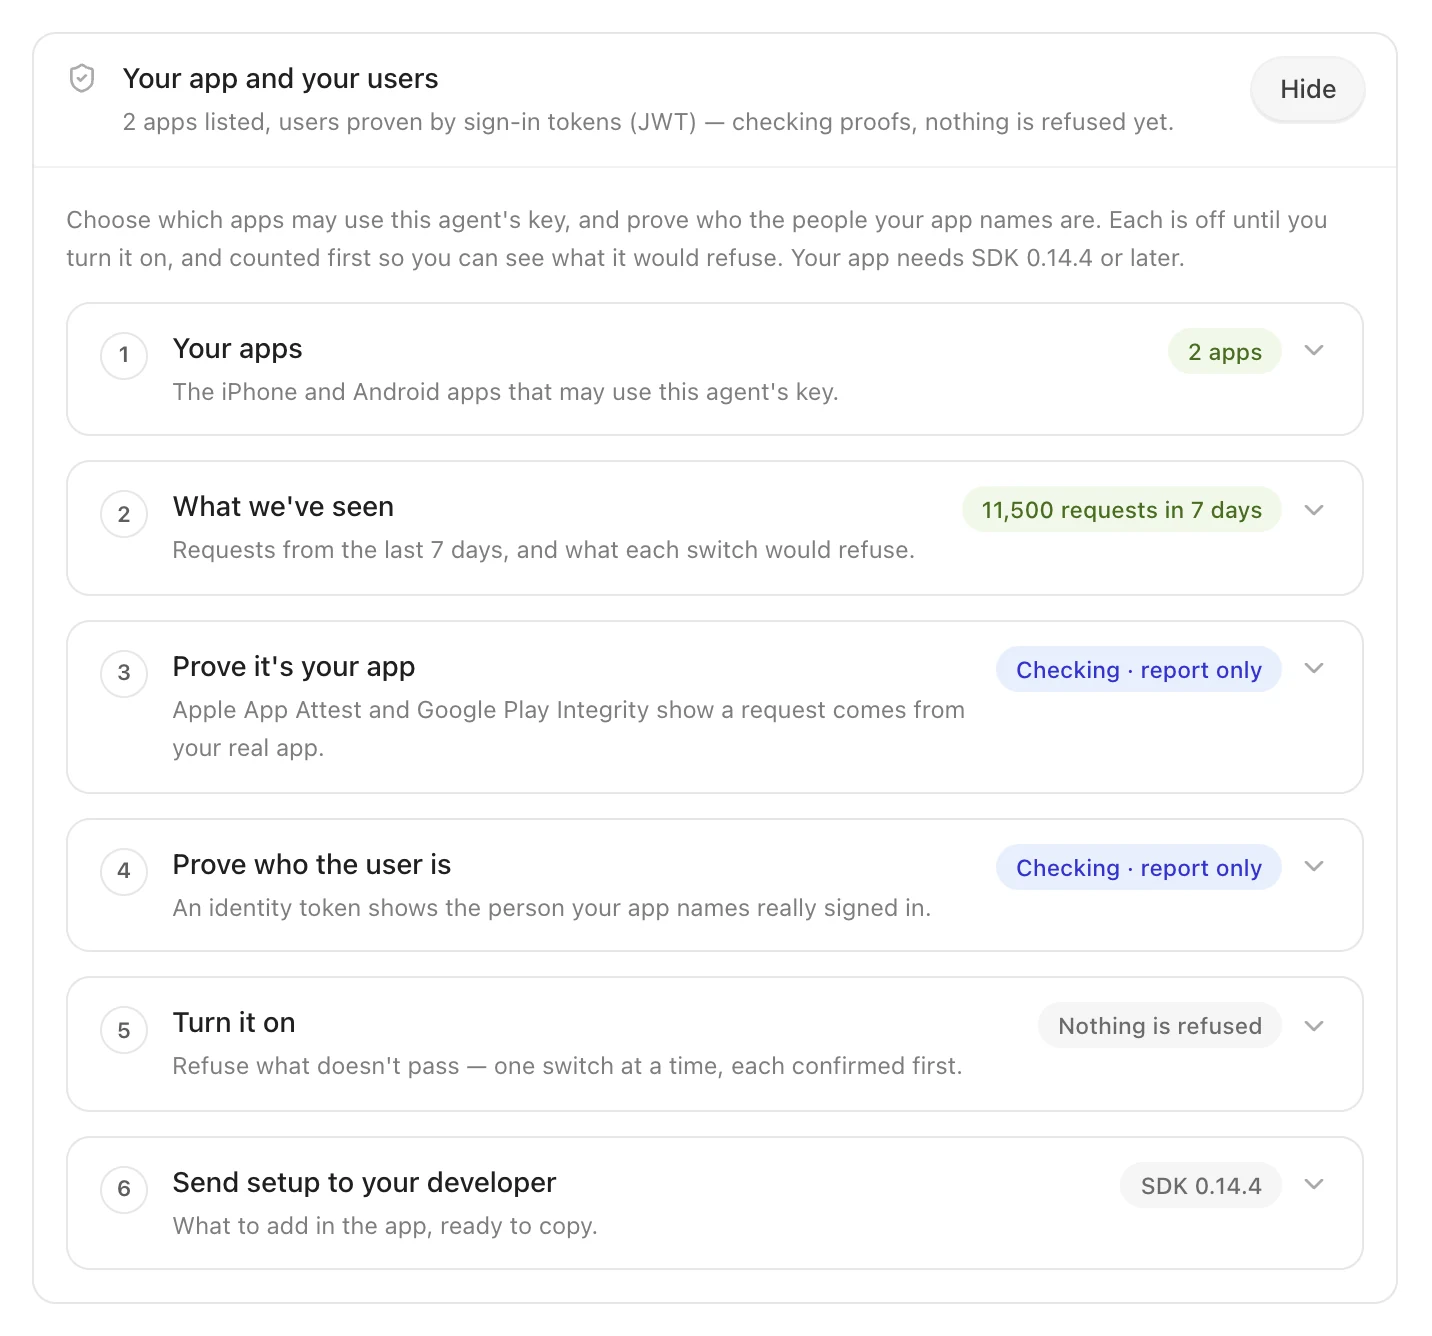
Your apps
Add your iPhone app and your Android app.
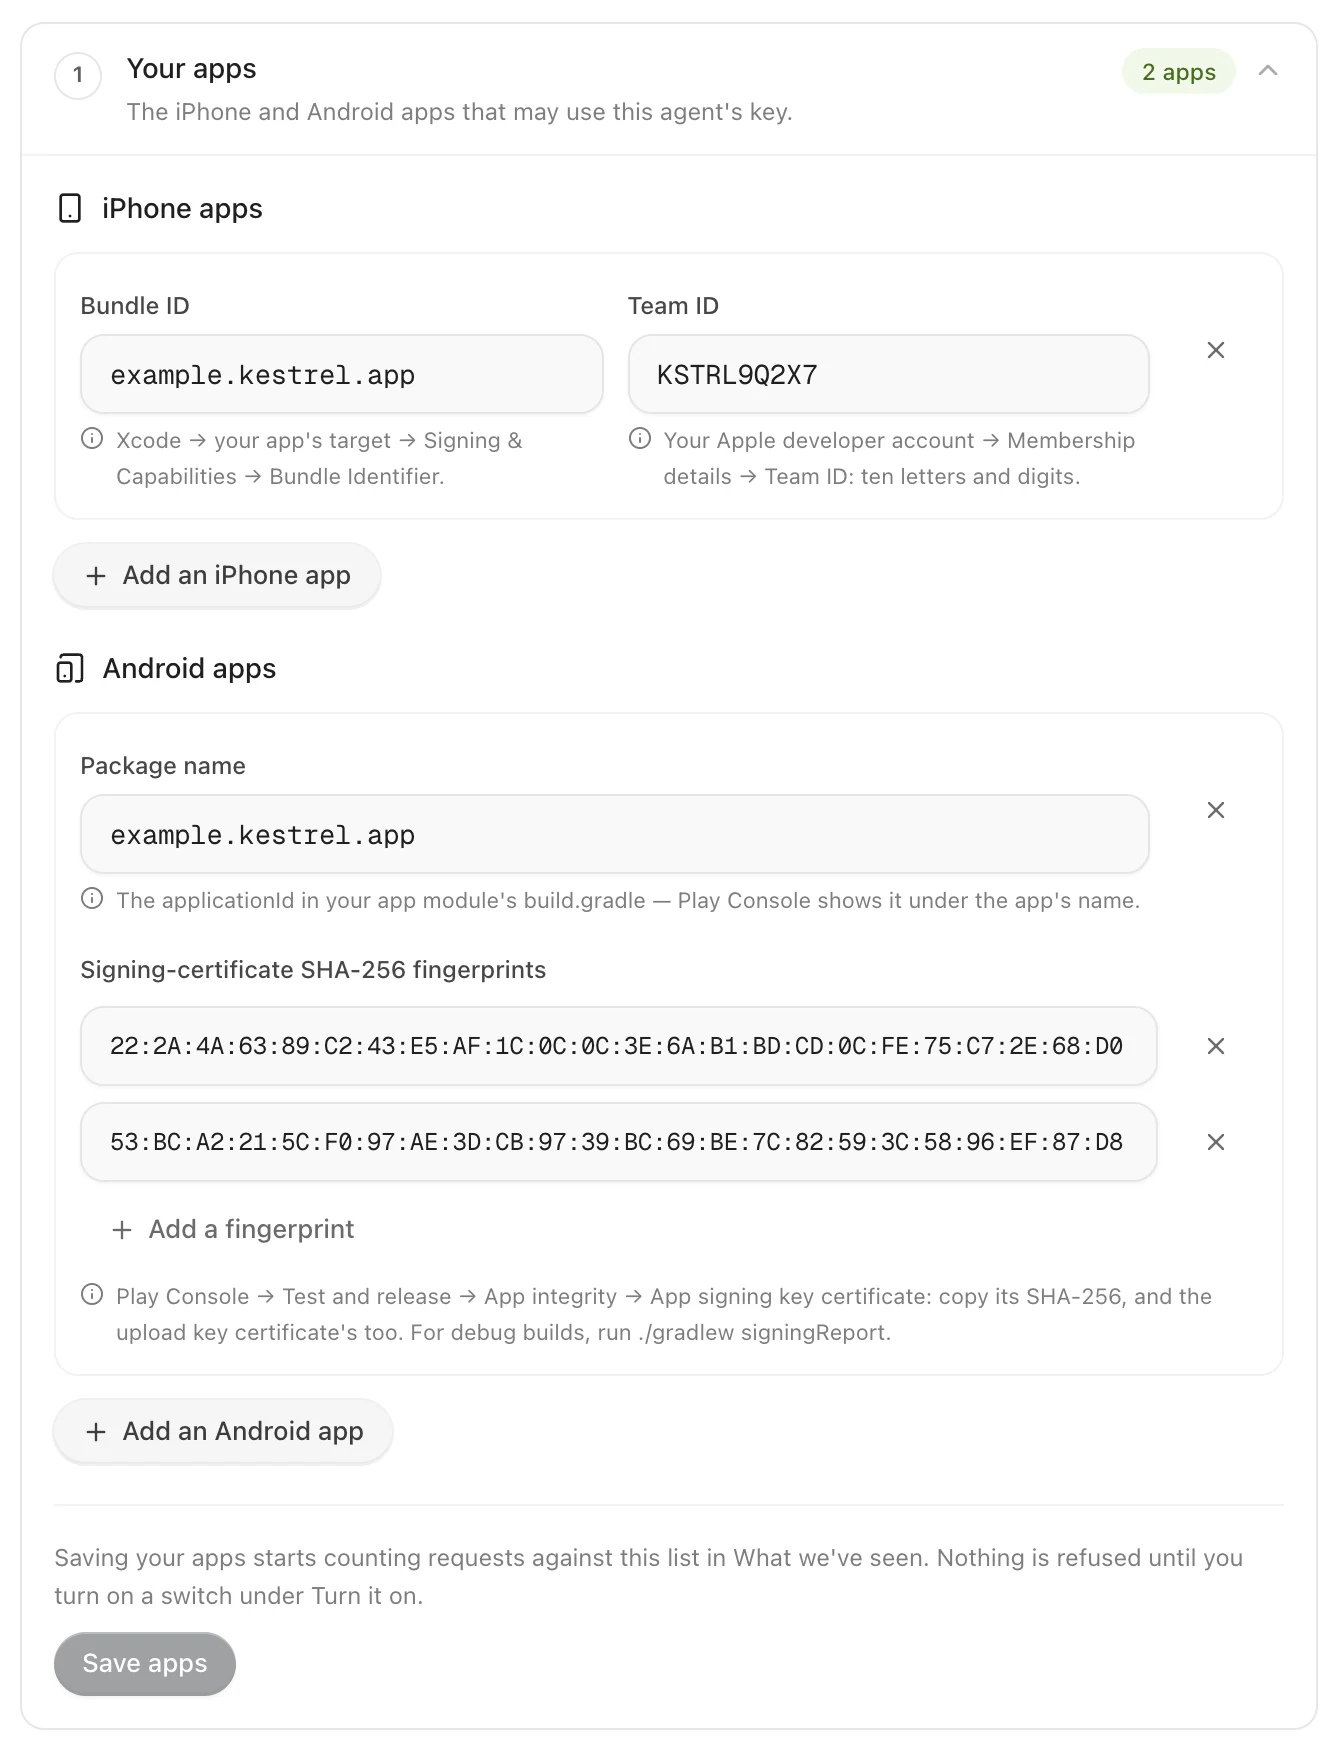
| Field | Where to find it |
|---|---|
| iPhone bundle ID | Xcode → your app target → Signing & Capabilities → Bundle Identifier |
| Team ID | Your Apple developer account → Membership (ten letters and digits) |
| Android package name | applicationId in your app's build.gradle |
| Signing certificate SHA-256 — add every one | Play Console → Test and release → App integrity → App signing key certificate (what users' devices see), plus the Upload key certificate; for debug builds, ./gradlew signingReport |
An in-house or ad hoc iPhone build signed by another team (an enterprise account, say) is another app here: add it with that team's Team ID. Up to five apps per platform, five certificates per app.
Saving your apps changes nothing for your users: the agent starts counting what it sees.
What we've seen
The last seven days of real requests, per platform and app ID: Allowed, Not in your list, Verified, Not verified, Development build and Debug token, with the reason for each and, for users, Verified, Unverified and Invalid token. Counts and app IDs only — never a user. Search by app ID; at most 20 rows per platform.
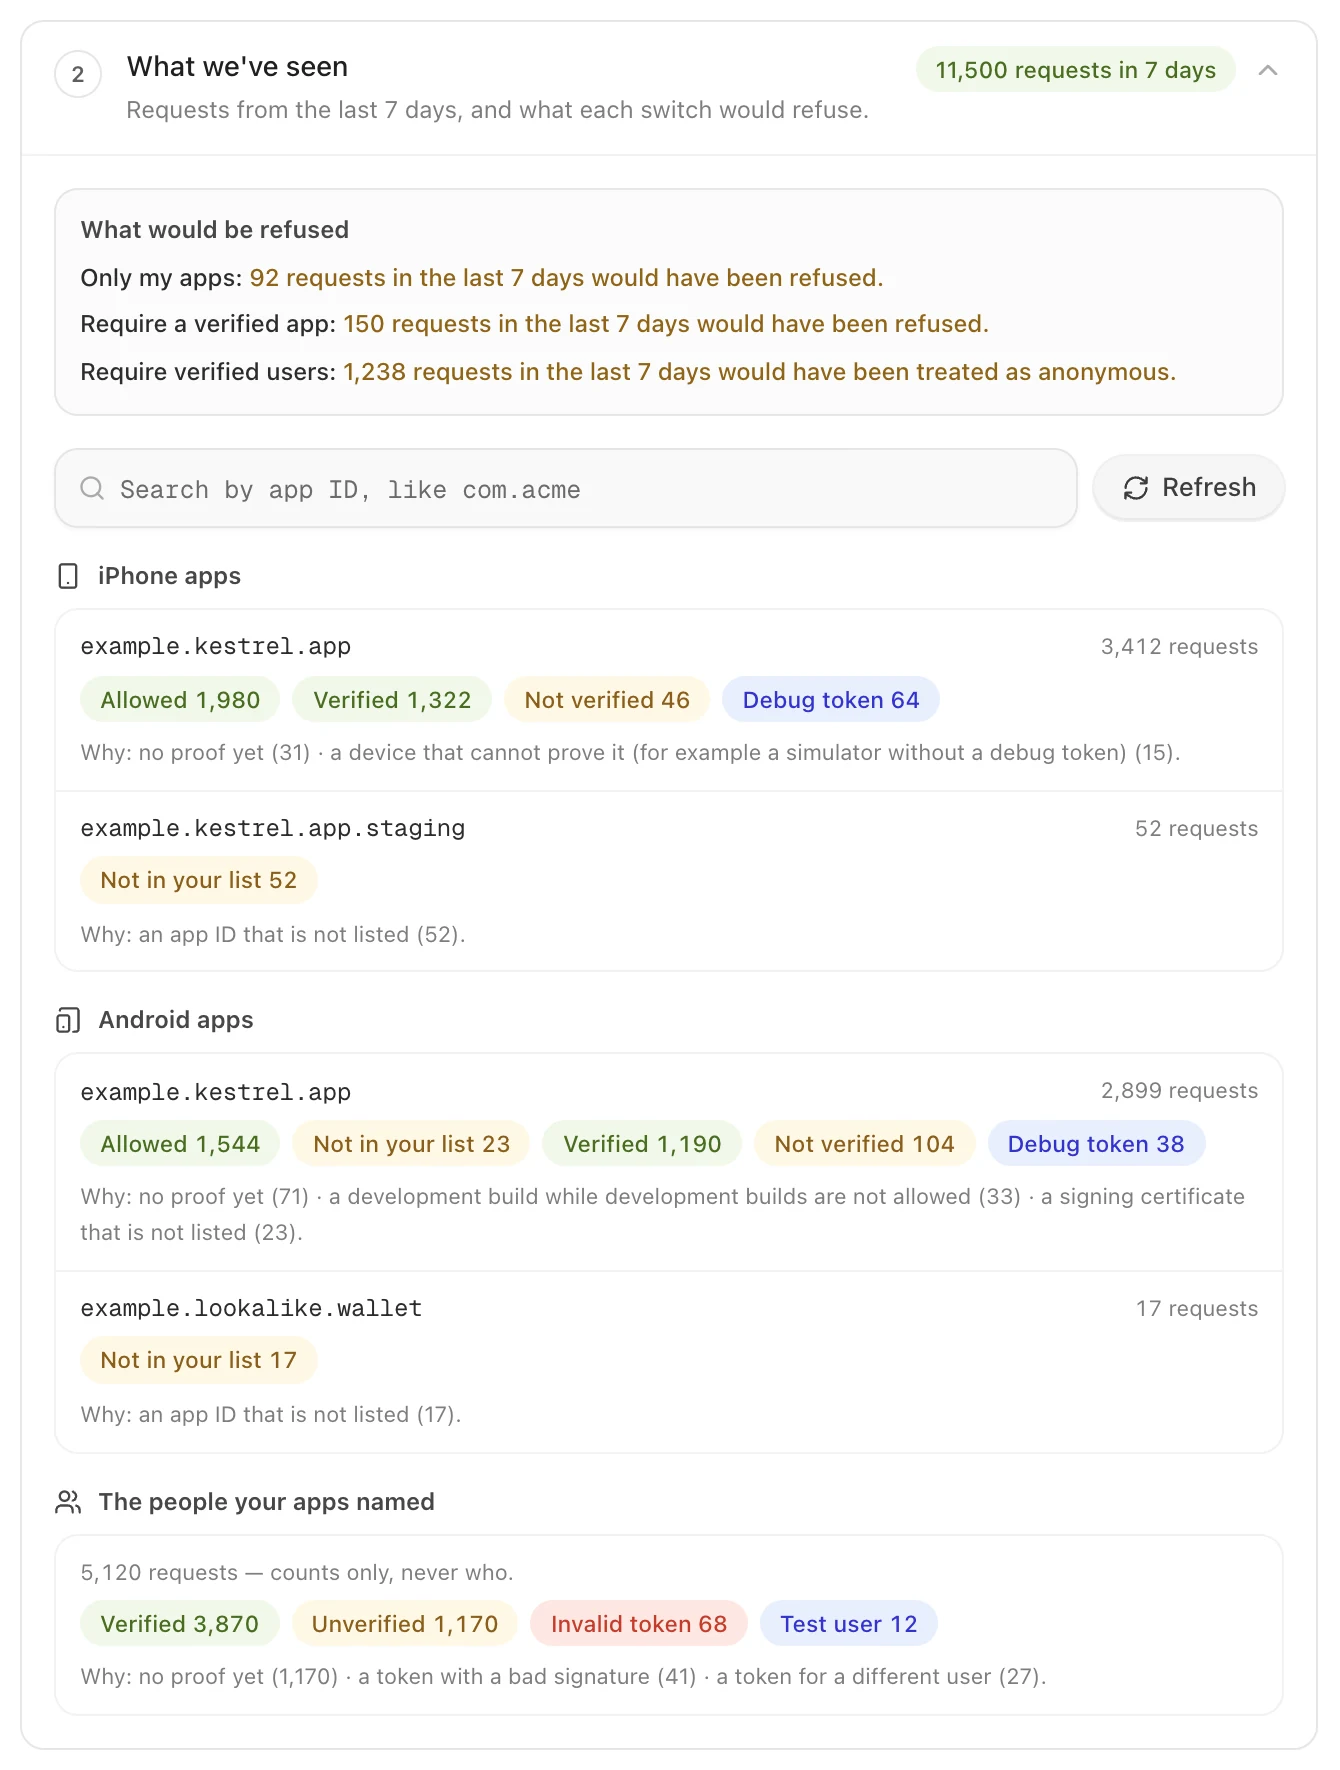
This is where you catch a missing certificate (most often the Play App signing certificate) or an older app version before anything is refused. To follow the checks one by one — each with its result and why — open the Security log from here.
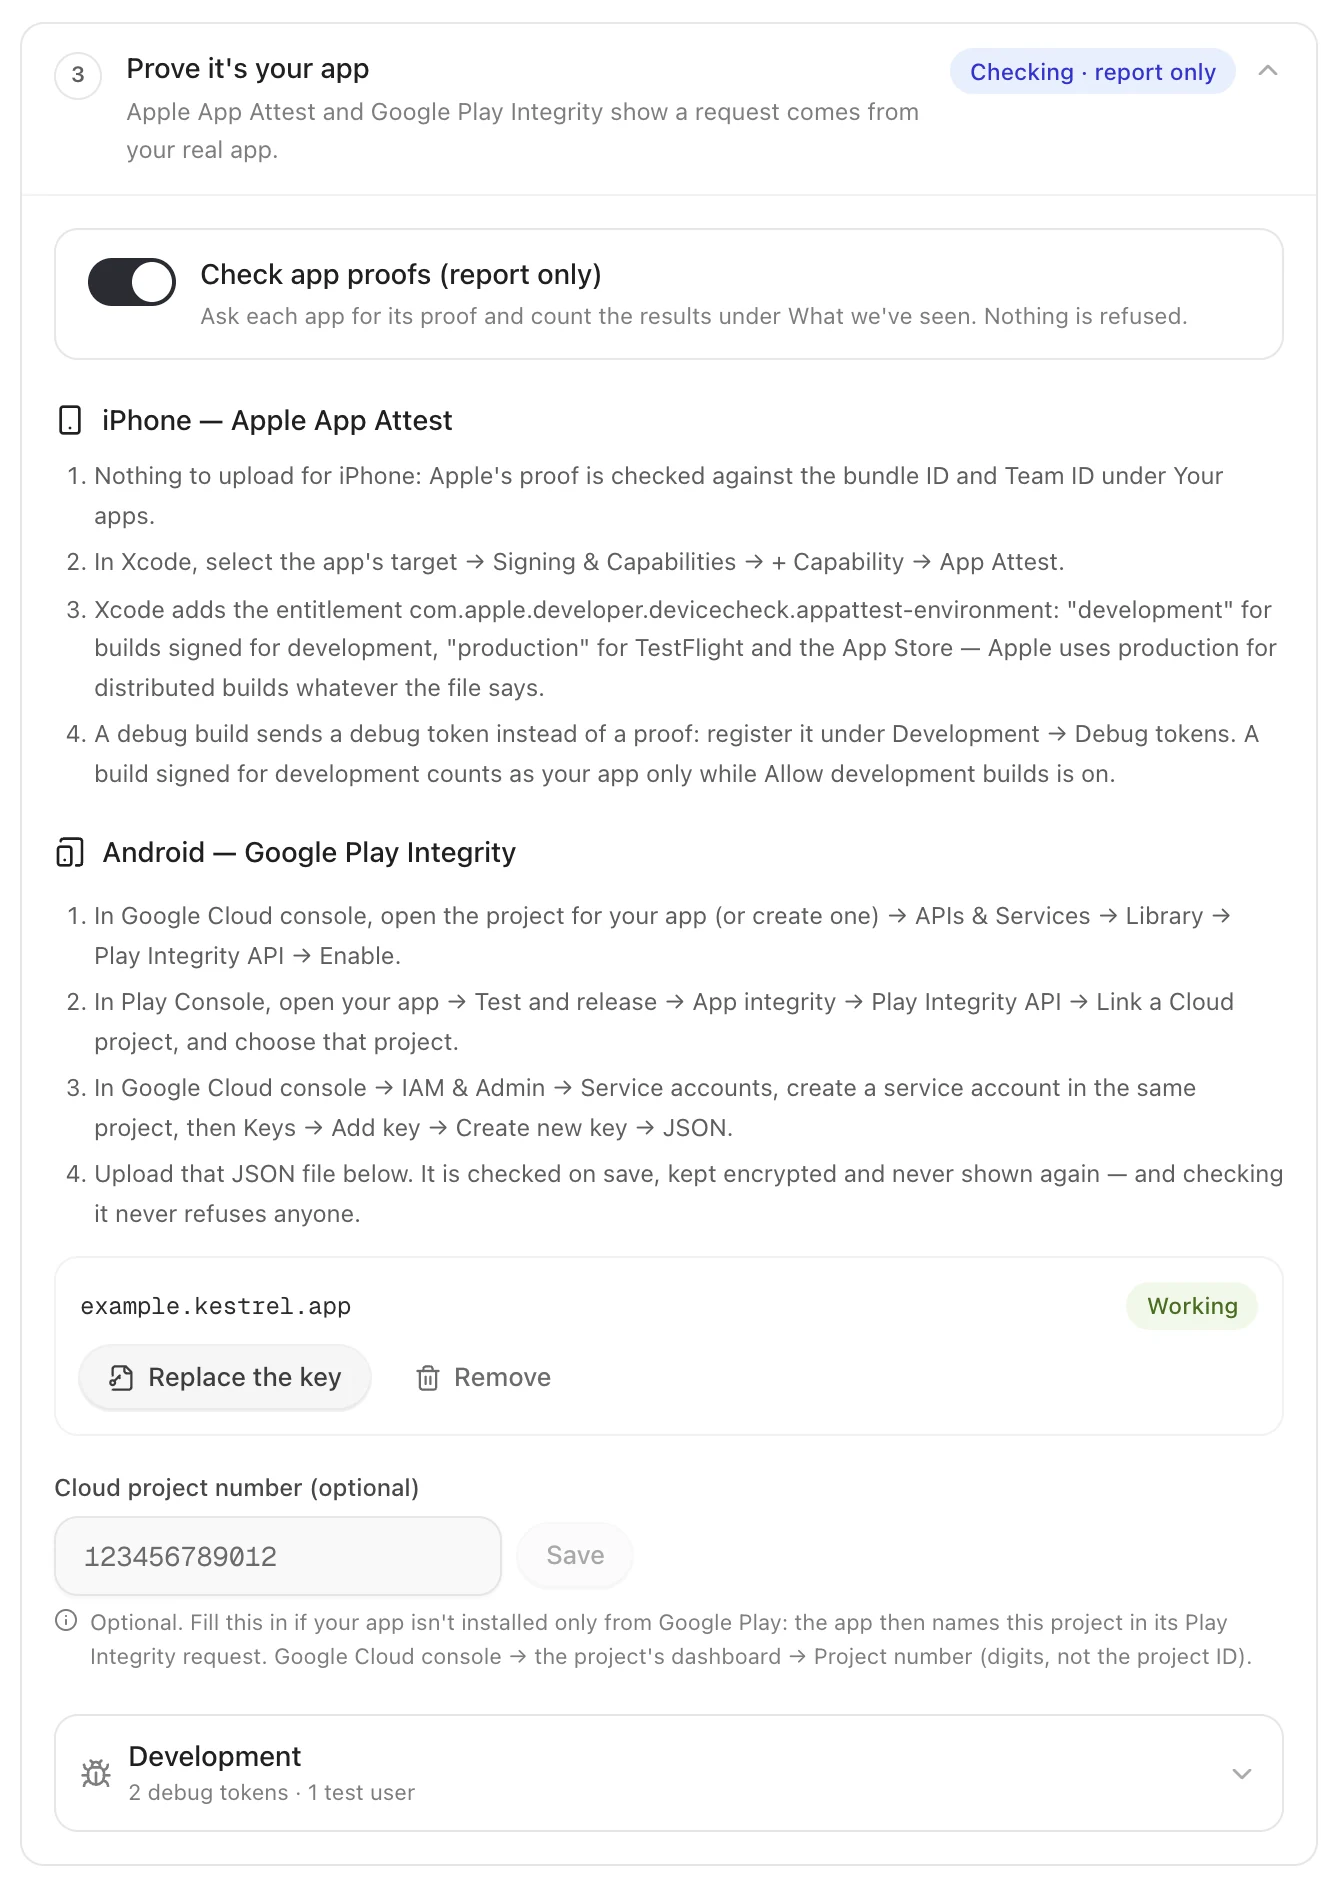
Prove it's your app (optional)
iPhone — App Attest. Nothing to upload. In Xcode, select your app target → Signing &
Capabilities → + Capability → App Attest. Xcode adds the entitlement
com.apple.developer.devicecheck.appattest-environment: development for builds you run from Xcode;
Apple uses production for TestFlight and App Store builds.
Android — Play Integrity.
- In Play Console, open your app → Test and release → App integrity → Play Integrity API and link a Google Cloud project.
- In that Google Cloud project, enable the Play Integrity API (APIs & Services → Library).
- Create a service account in the same project (IAM & Admin → Service accounts; no role is needed) and add a JSON key.
- Upload the JSON key in the dashboard. It is checked on save — that the API is enabled and the project linked — without refusing anyone, stored sealed, and never shown again.
- Optional: enter the project number (Cloud console → project dashboard). Apps installed from outside Google Play need it.
Then switch on Check app proofs (report only): apps on 0.14.4 start proving themselves, and "What we've seen" shows the verdicts.
Play Integrity requests count against a daily quota (Google's default is 10,000 per app per day). An install proves itself about once a day, then reuses the verdict, so a typical app stays well inside it; Google can raise the quota.
Prove who the user is (optional)
Choose one method. Not sure which? See Which way should you prove users?
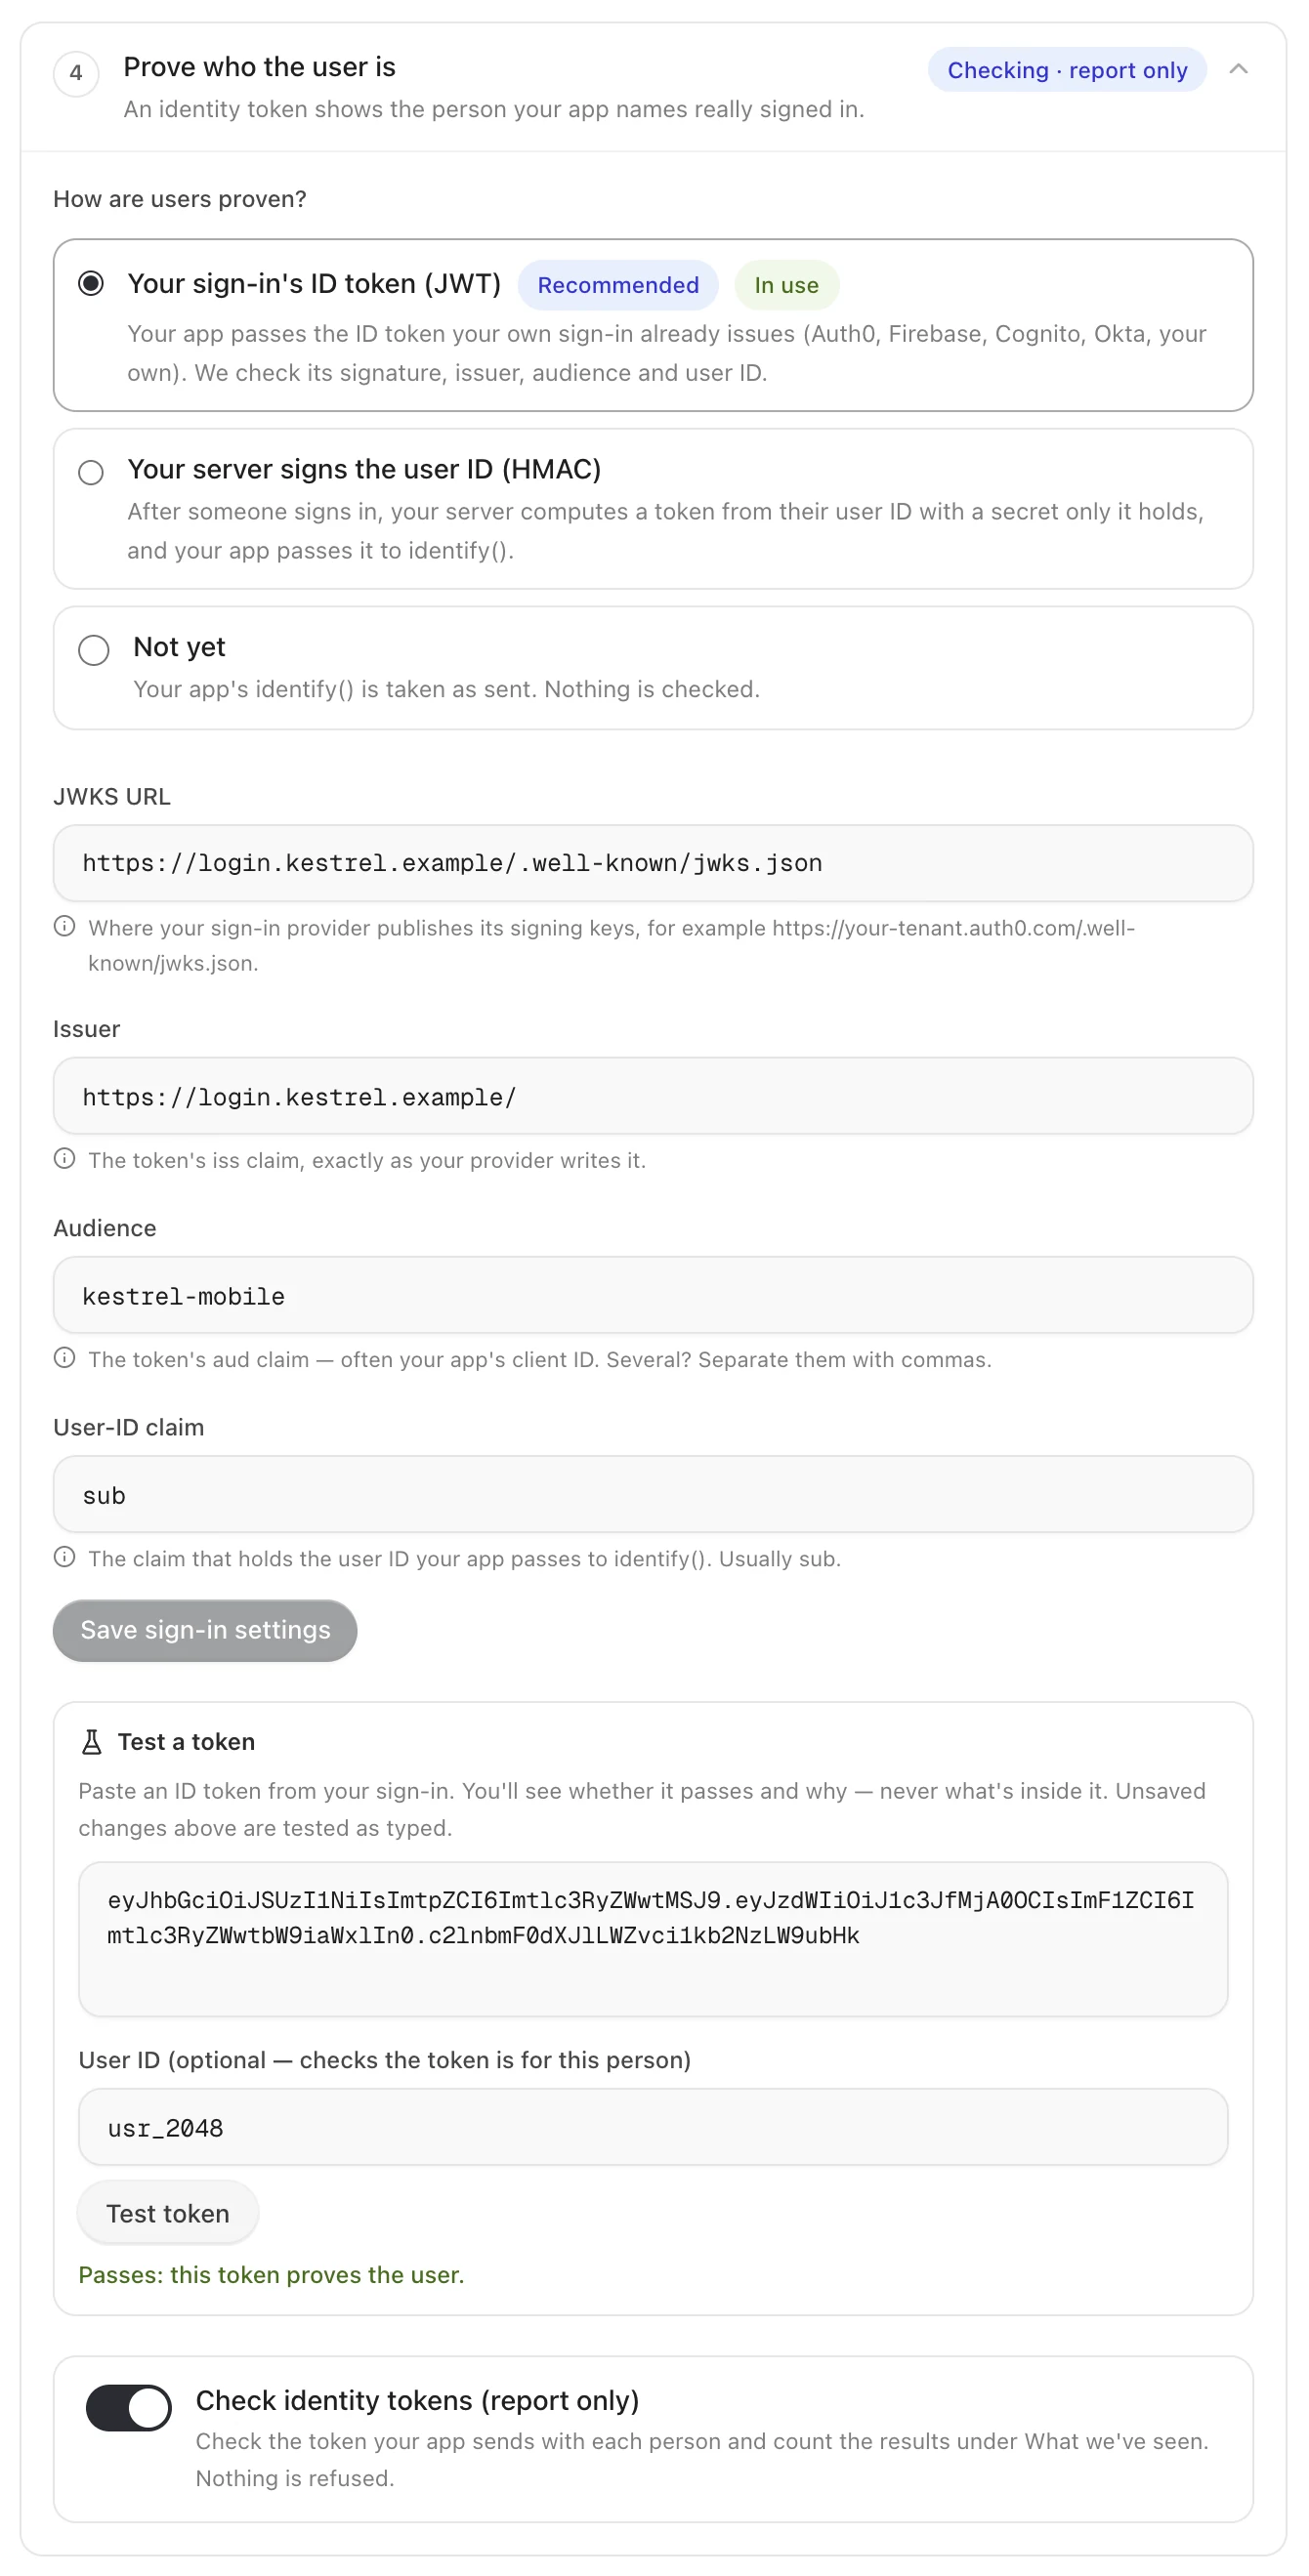
Your sign-in's ID token (recommended). If your app already signs users in with a provider that
issues ID tokens — your own, or a hosted one — pass that token. Enter its JWKS URL (where the
provider publishes its public signing keys — what that is),
the issuer, the audience and the claim that holds the user ID (often sub). Use Test a
token to paste a token and see pass or fail and why — it never shows the token's contents. Tokens are
checked with a minute of clock tolerance; keys the provider rotates are picked up automatically. Of
the two methods here, we recommend it because we hold no secret for it: the token is checked against
the public keys your provider publishes.
Values for common sign-ins
The values for common sign-in providers, with your own project, tenant or client ID in place of the angle brackets:
| Your sign-in | JWKS URL | Issuer | Audience | User-ID claim |
|---|---|---|---|---|
| Firebase Authentication | https://www.googleapis.com/service_accounts/v1/jwk/securetoken@system.gserviceaccount.com | https://securetoken.google.com/<project-id> | <project-id> | sub |
| Auth0 | https://<tenant>.auth0.com/.well-known/jwks.json (or your custom domain) | https://<tenant>.auth0.com/ | your application's Client ID | sub |
| Amazon Cognito | https://cognito-idp.<region>.amazonaws.com/<user-pool-id>/.well-known/jwks.json | https://cognito-idp.<region>.amazonaws.com/<user-pool-id> | your app client ID | sub |
| Okta | https://<your-org>.okta.com/oauth2/default/v1/keys | https://<your-org>.okta.com/oauth2/default | your app's Client ID | sub |
| Sign in with Google | https://www.googleapis.com/oauth2/v3/certs | https://accounts.google.com | your OAuth client ID | sub |
| Sign in with Apple | https://appleid.apple.com/auth/keys | https://appleid.apple.com | your app's bundle ID | sub |
| Supabase Auth (asymmetric signing keys) | https://<project-ref>.supabase.co/auth/v1/.well-known/jwks.json | https://<project-ref>.supabase.co/auth/v1 | authenticated | sub |
| Your own sign-in (OpenID Connect) | the jwks_uri in its /.well-known/openid-configuration (often /.well-known/jwks.json) | its iss | its aud | the claim holding your user ID |
- The claim must hold the user ID your app passes to
identify. If your app identifies people by something other than the provider's user ID (a customer number, say), put it in a claim and name that claim here. - Copy the issuer exactly as your tokens carry it, trailing slash included. Test a token says which field doesn't match.
- Does your own API accept the same ID token as a login? Then give Graine one issued for it, with its own audience, so the token your app hands us can't be replayed against your API (why).
- Public-key signatures only (RS, PS, ES and EdDSA). A sign-in whose tokens are signed with a shared secret (HS256), one with no ID tokens at all (session cookies, a one-time code checked by your own server), or one you would rather not expose: use a signed user ID instead.
- No sign-in at all: leave this off. People are treated as anonymous: chats and calls work, but there is no memory, booking or past chats for them.
- The strongest mode works with any sign-in: server tokens. Your server already knows who is signed in, and mints each person a short-lived token.
A signed user ID (the alternative). Create a secret in the dashboard — it is shown once; store it on your
server. After your own sign-in, your server computes HMAC-SHA256 of the user's ID with that secret
and gives the result to your app, which passes it to identify. During a rotation two secrets work
at once: create the new one, update your server, then retire the old one. Each agent has its own
secret, but your app gives the SDK one identity token for all its agents: if one app uses several
agents, use your sign-in's ID token, which works for all of them.
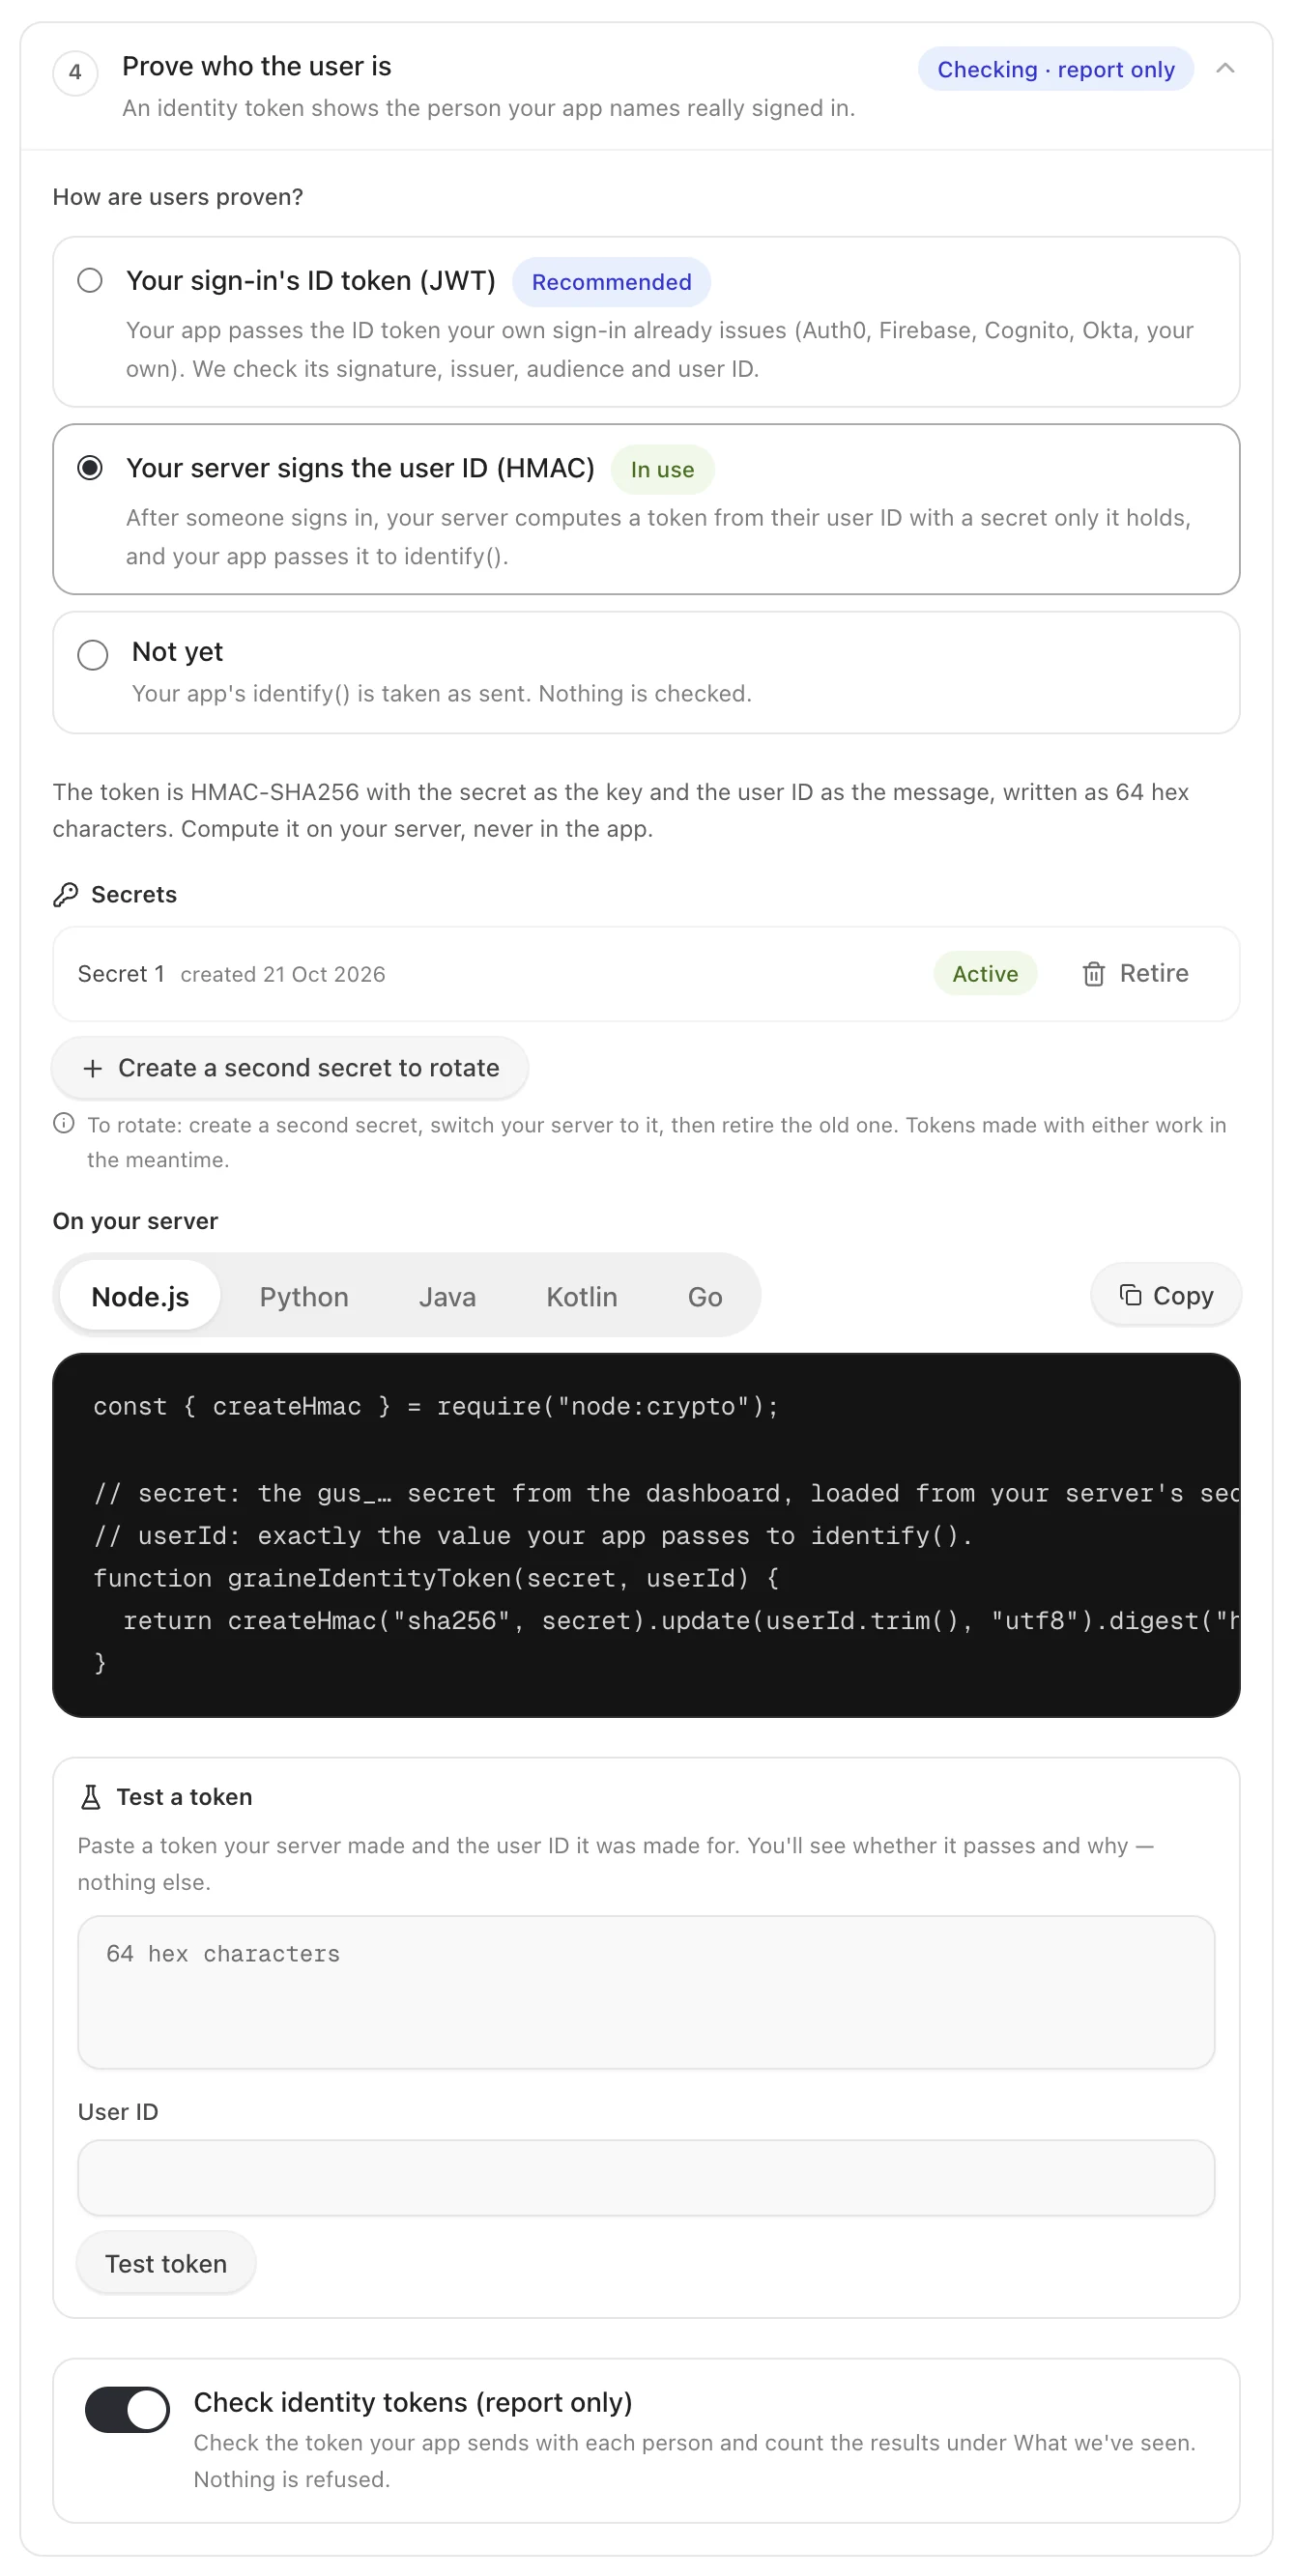
The user ID is exactly the value your app passes to identify for the agent's identity field
(Who is the user?). Never put the secret in your app.
Turn it on
Three switches, each with a confirmation that states what it will refuse and how much of last week's traffic that would have been:
- Only my apps — any app not under Your apps (or on an SDK older than 0.14.4) is refused with
app_not_allowed. - Require a verified app — an app request without a proof is refused with
app_not_verified. - Require verified users — an unproven user gets anonymous answers; memory, booking and past
conversations answer
identity_unverified.
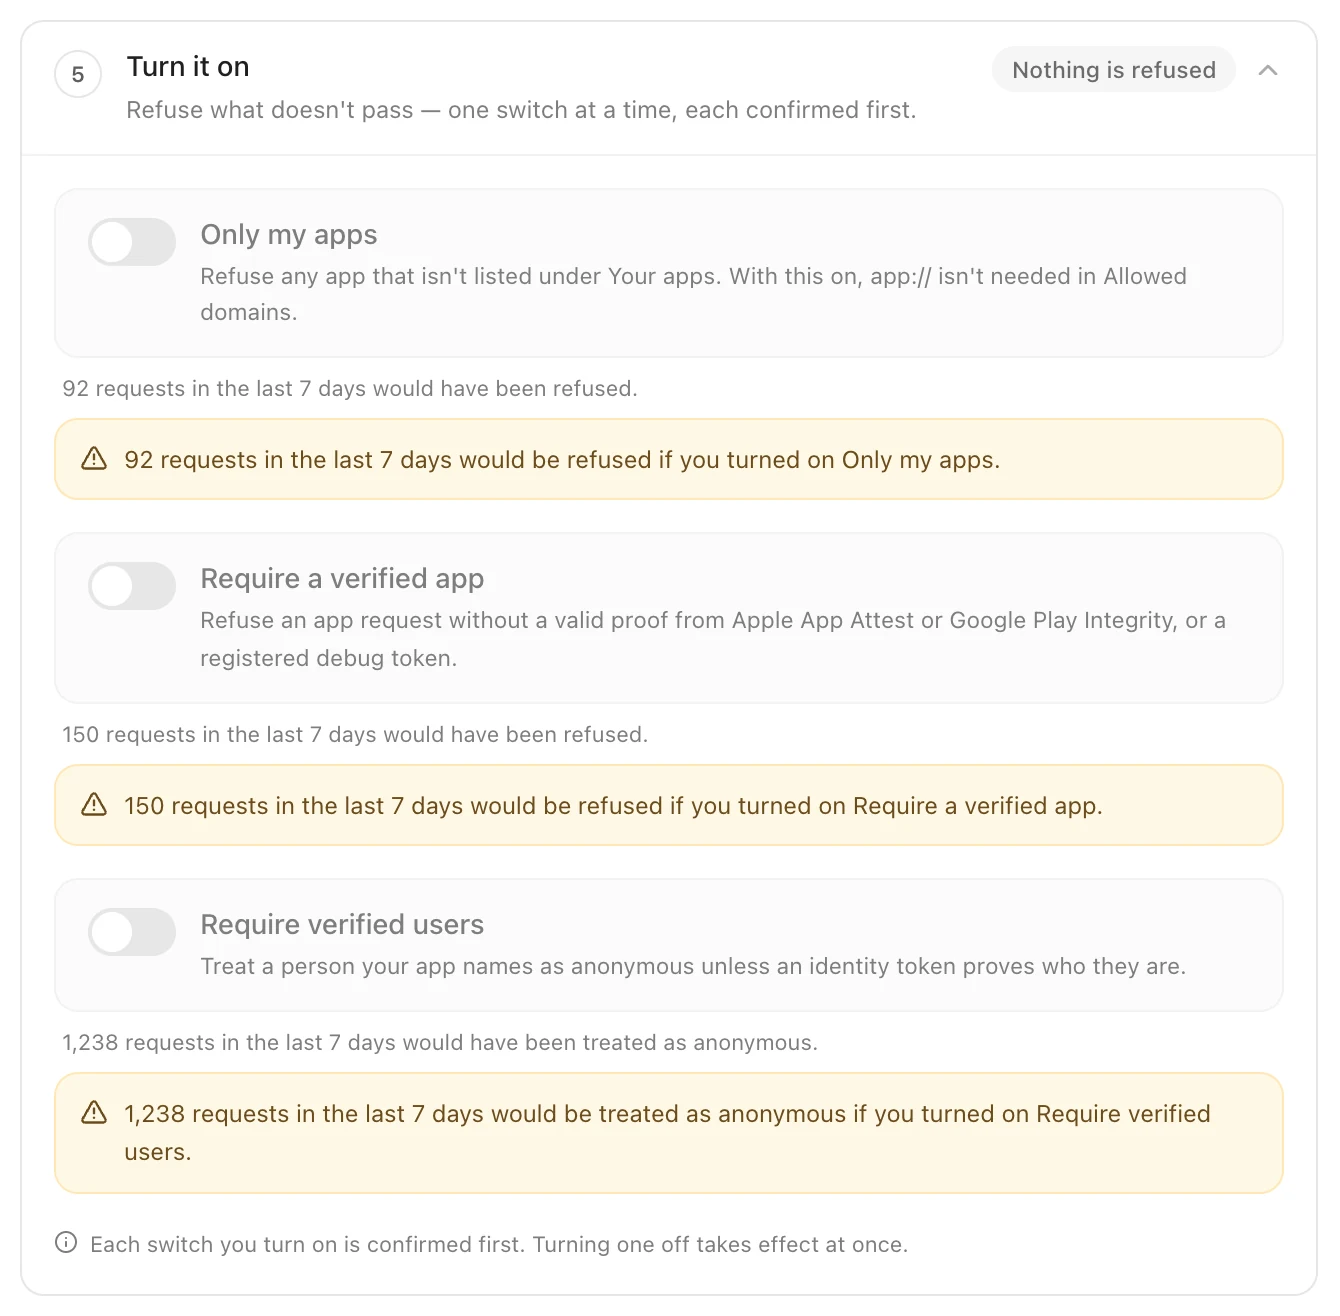
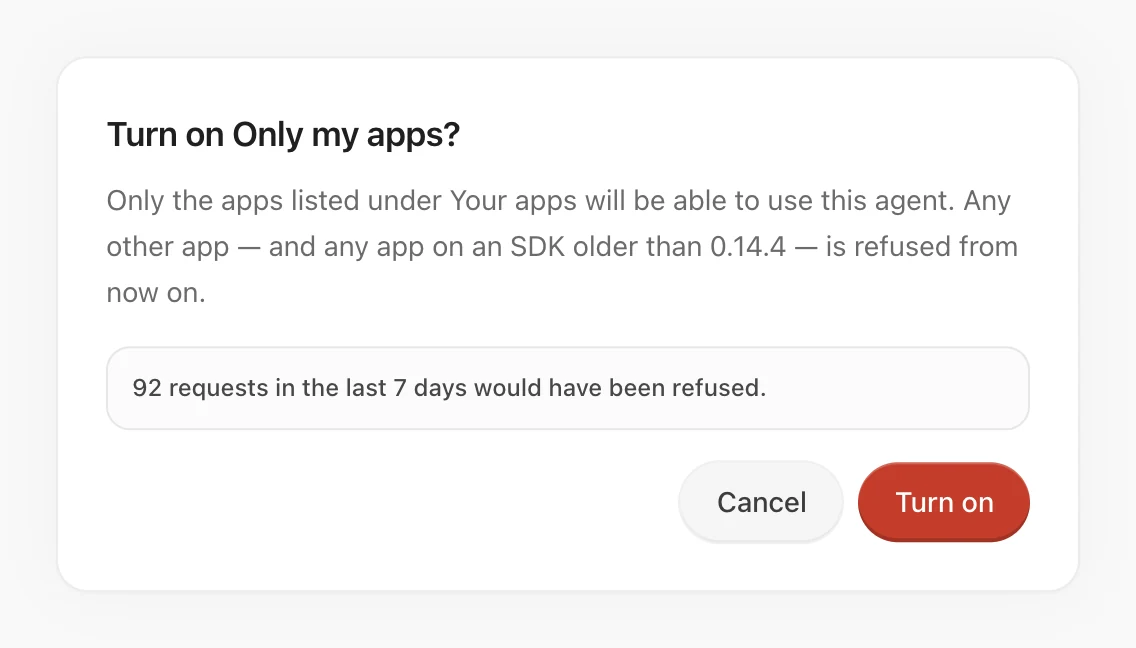
Turning a switch off takes effect within 30 seconds and needs no confirmation.
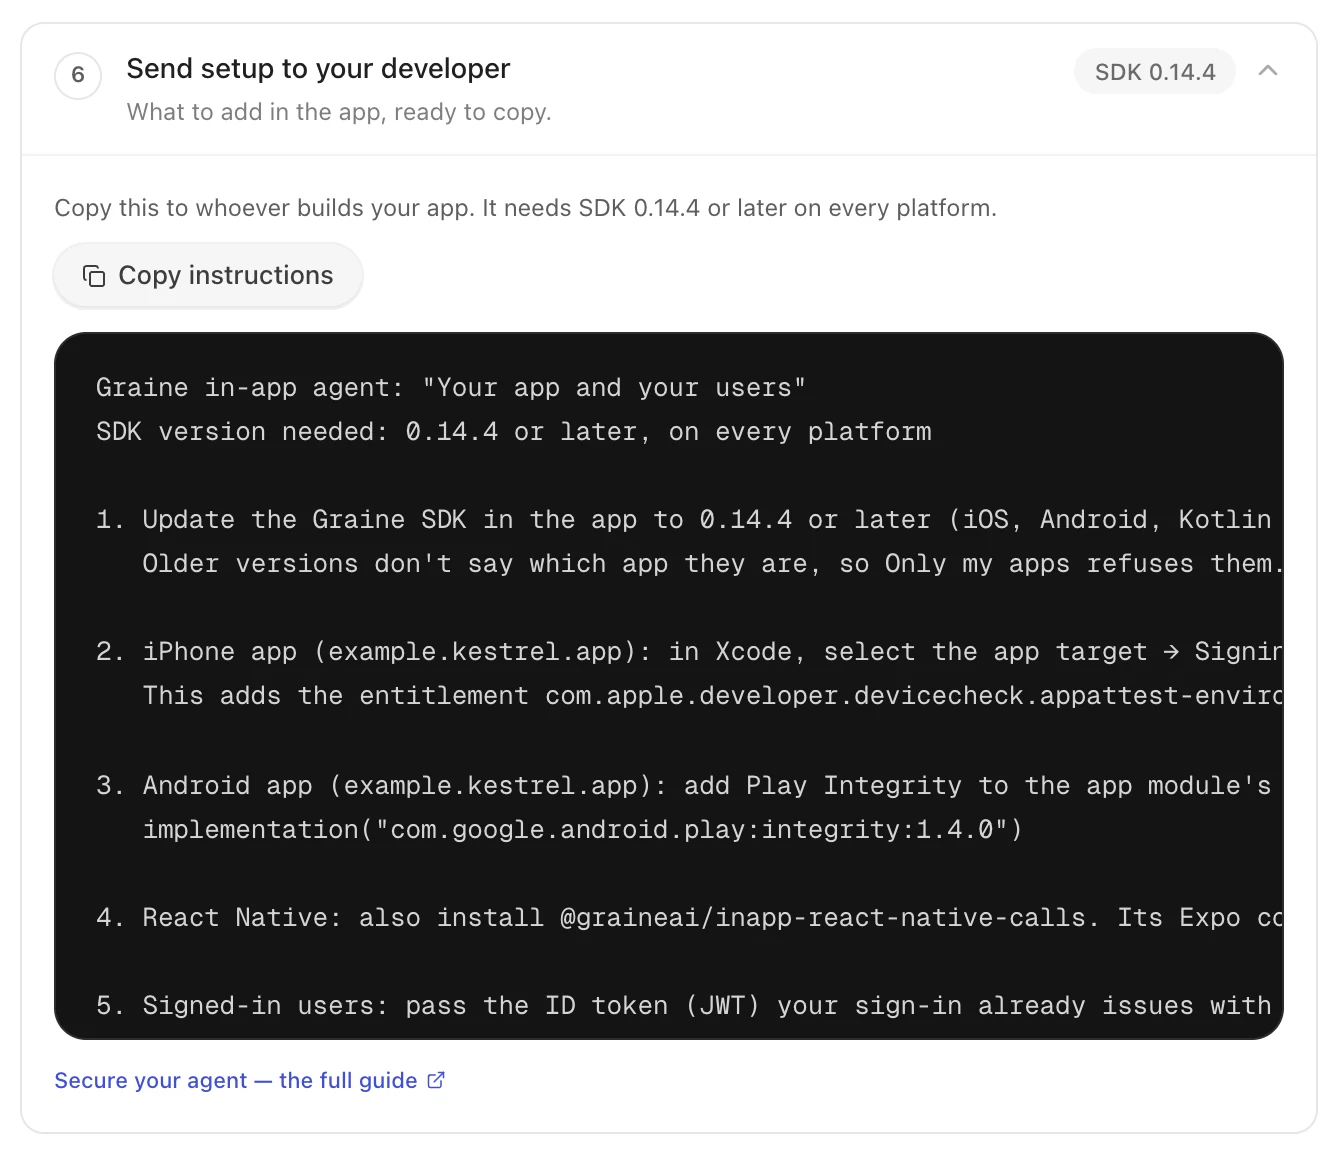
Send setup to your developer
The last step gives you a short block to copy: update to SDK 0.14.4, add the App Attest capability
and the Play Integrity dependency, pass the identity token to identify, and a link to this page.
What is a JWKS URL, and where is mine?
A JWKS URL is a public web address where your sign-in publishes the public keys that check its tokens' signatures. JWKS means JSON Web Key Set, a published standard (RFC 7517). Private keys are never in it: your sign-in keeps them, and only it can sign a token.
Each key in the set has an ID, its kid, and each token's header names the kid of the key that
signed it. That is how your sign-in rotates keys without breaking anything: it publishes a new key
beside the old one and starts signing with it, and we pick up the change by ourselves.
Where yours is: Values for common sign-ins, above, lists it for
Firebase, Auth0, Amazon Cognito, Okta, Google, Apple and Supabase. For your own sign-in, open its
OpenID Connect discovery document, /.well-known/openid-configuration: the JWKS URL is its jwks_uri.
Check yours: open it in a browser.
- It shows
{"keys": [ … ]}: a list of keys, each with its type (kty, such asRSAorEC) and itskid. - No key in it has a
d. A key with adis a private key, there for anyone to sign tokens with: have your sign-in replace that key before you go on. - It starts with
https://and answers at that exact address. We read it without signing in and without following redirects, so a sign-in page, an error page or a redirect means it is the wrong address.
In your app
The SDK sends which app it is on every request by itself. Add the identity token, a way to refresh it, and, on first launch, the app's proof.
Fetching the token after sign-in? Identify the user right away and set the refresher. From SDK 0.14.6 on iOS, Android and Kotlin Multiplatform, and website loader 1.6.1, while no token is held, the SDK asks your refresher before the user's first conversation, and before a request for them, and waits for it, at most 10 seconds, so that conversation is verified. On a website the widget's conversation waits at most a second more, so the loader asks as soon as the visitor shows interest in the widget. Answering a call that rings never waits. With Flutter, React Native or an older SDK, fetch the token before you identify, or the first conversation may be answered anonymously.
A token that expires never cuts a live chat or call. Tokens are checked when a conversation
starts; a conversation already running carries on, and its reconnects are covered for an hour after
the last successful check. Call the refresher hook (or setIdentityToken) to keep tokens fresh.
Signing out and in as someone else never mixes people. identify(null), or another user's
traits, drops the previous token and its verdict in the same step.
Test with verification on
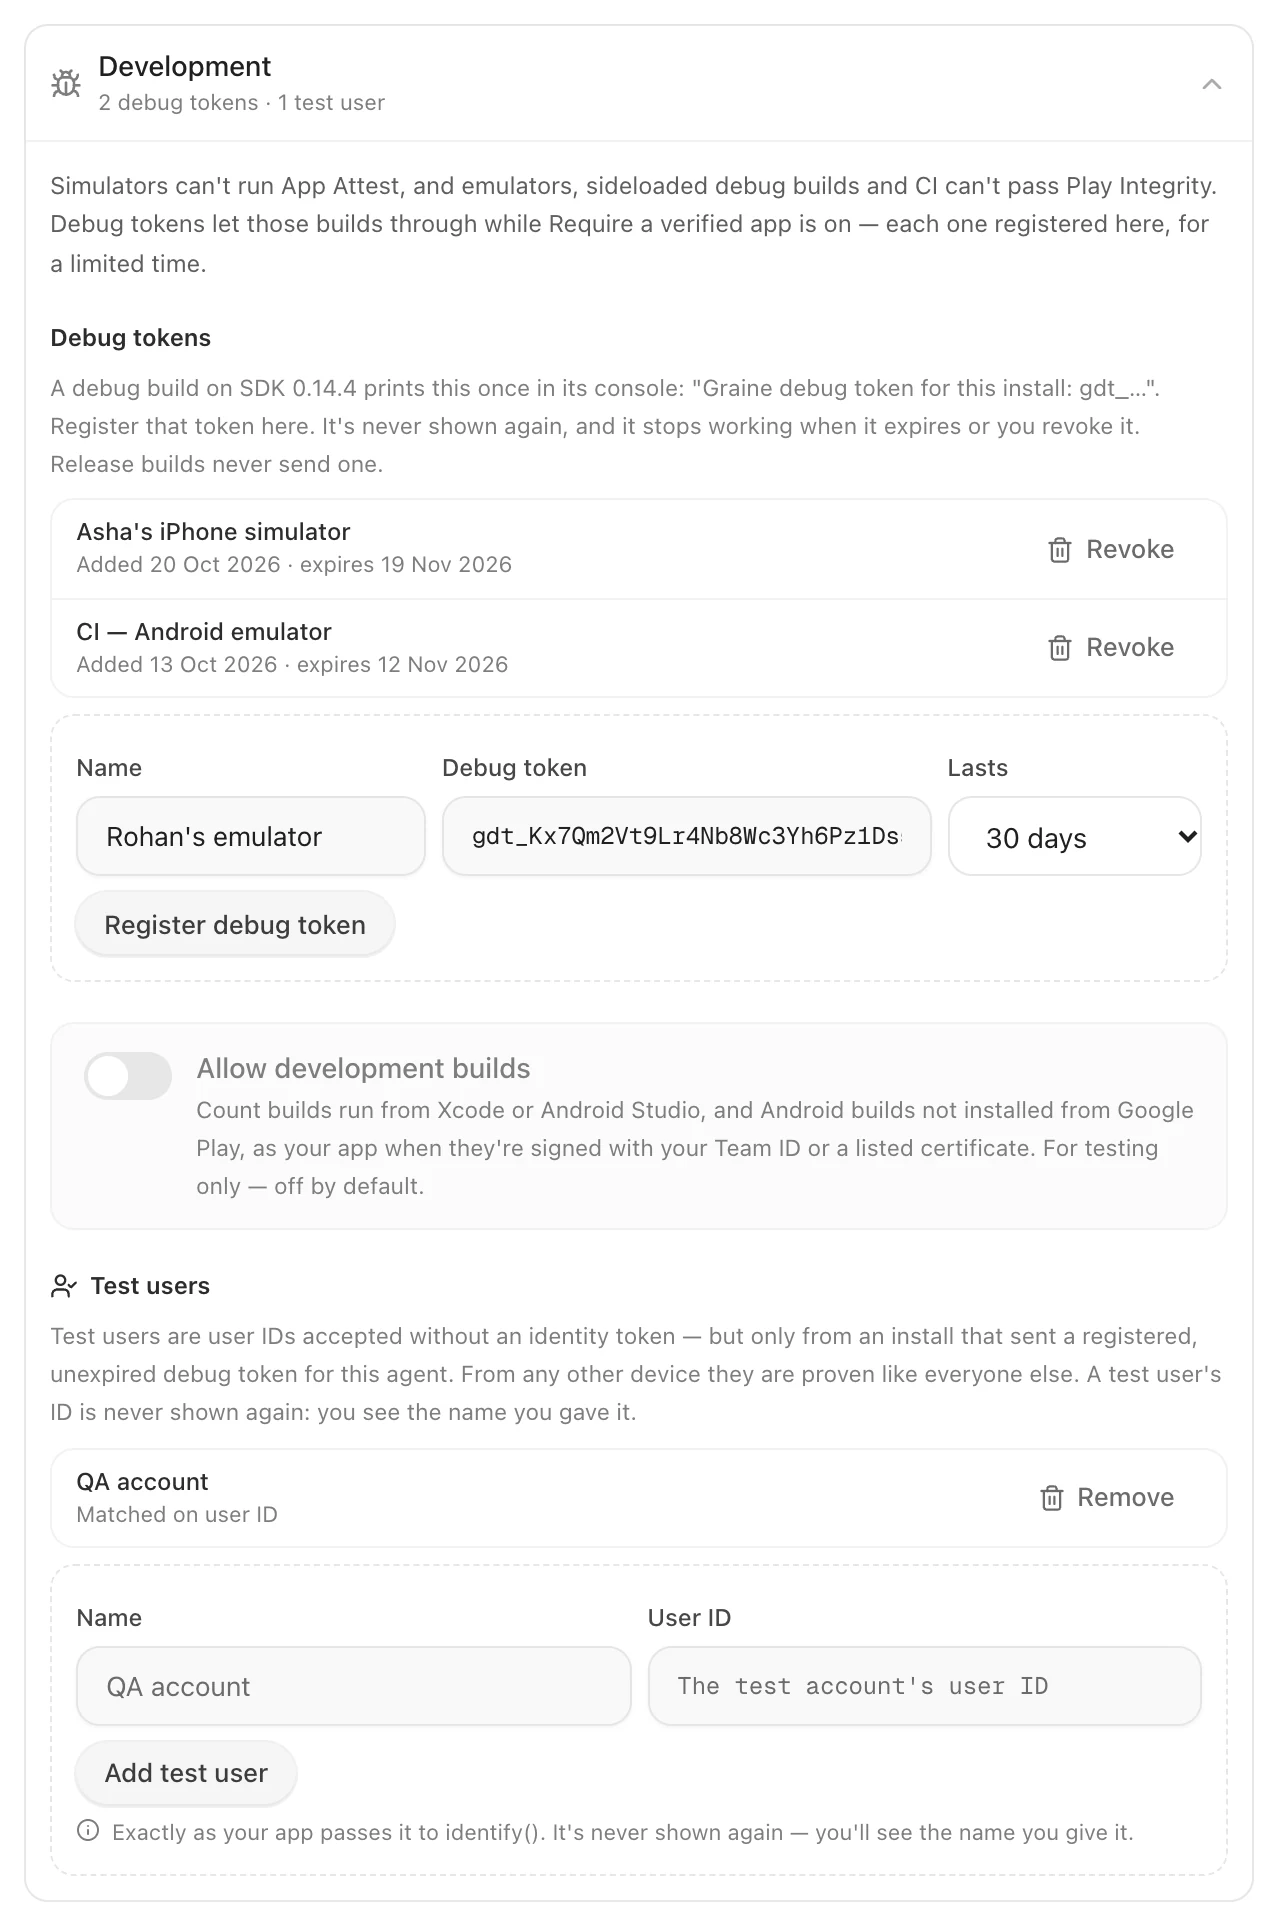
Simulators cannot run App Attest; emulators, sideloaded debug builds and CI cannot pass Play Integrity. Development mode keeps them working once you enforce:
- Debug tokens. A debug build creates a debug token once per install, prints it in the console
—
Graine debug token for this install: gdt_…— and sends it instead of a proof. A release build never creates, prints or sends one unless your app explicitly opts in (debugTokenModeset to always, for an internal test build). Each SDK detects debug builds the platform's way: iOS from the build configuration or the Simulator, Android from the app's debuggable flag, Flutter from debug mode, React Native from development mode. - Register it under Prove it's your app → Development → Debug tokens with a name ("Asha's simulator", "CI"). A registered token counts as a verified app for that agent only, expires after 30 days by default (at most 90), can be revoked at any time, and is never shown again. Up to 20 per agent; each use appears as Debug token in "What we've seen".
- Allow development builds (off by default) accepts App Attest's development environment and Android builds installed outside Google Play when they are signed with a listed certificate. Its confirmation states the risk: anyone with your development signing key could pass as your app. Turn it off before you release.
- Test users (up to 20) are user IDs accepted without an identity token — only from an install that sent a registered debug token, never from a real device without one.
Every agent your app uses needs its own lock
Each publishable key is separate, and so are the settings on this page: an agent's switches cover only the requests made with that agent's key. If your app ships keys for two agents — a support agent and a sales agent, say — set up and switch on both. An unlocked second agent is a way in: its key is in the same app for anyone to read, and with nothing switched on, any app can use it and name any user.
The Security page, in the sidebar under Account, shows any agent whose key any app can use. See Secure your workspace, and for several agents in one app, Multiple agents.
Roll it out
- Update your app to SDK 0.14.4 and release it.
- Add Your apps, and the proofs you want, on every agent your app uses. Leave everything report-only.
- Watch What we've seen and the Security log for a few days, until Not in your list and Not verified are only traffic you do not recognise. Run Test it end to end: what a switch would refuse shows as Would be refused.
- Turn on Only my apps, then Require a verified app and Require verified users, one at a time, and run the test again.
Test it end to end
Check that each switch does what you expect, with the builds your users get. Run the list first while the switches are report-only: nothing is refused, and the Security log says Would be refused where a switch would refuse. Then run it again with the switches on, and you should see what each step says. Do it for every agent your app uses.
- Your key in another app. Put your publishable key into an app that isn't under Your apps — a
new, empty app with its own bundle ID or package name — and open a chat. You should see it refused
with
app_not_allowed(Only my apps). - An install without a proof. Run a debug build of your app on a simulator or emulator, where it
can't prove itself, without registering its debug token. The build must be under Your apps (on
Android, list its debug certificate); otherwise Only my apps refuses it first. You should see it
refused with
app_not_verified(Require a verified app). - Your real app. Install it from TestFlight or a Google Play testing track, and open a chat. You should see it as Verified under What we've seen.
- A user without an identity token. Sign in, but don't pass an identity token to
identify. You should see the agent answer anonymously: no memory, no past conversations, no booked calls (Require verified users). - The Security log. Open it, and read the rows for the tries above: which check ran, the result and why.
Security log: trace every check
Each check an agent's security makes, and each change to its security settings, is in the Security log — what it decided and why, with the app, the platform, a one-way install code and which part of the agent it was for. A refused request is one row, the check that refused it; passes and report-only results are one row per install every 10 minutes (report-only ones counted ×N). Rows are kept for a year, filtered as you choose, a page at a time, and can be downloaded as CSV. Open it under Security → Security log, or for one agent in What we've seen above. Only Admins can open it, and it never holds an IP address, a user ID, a name, a phone number, an email, a token, a proof or a key.
What each row shows, how rows are grouped, and how to filter, page and share: Security log.
If something is refused that should not be
Turn the switch off — it takes effect within 30 seconds — then find the request in the Security log, or look at What we've seen: the reason names what was missing (an unlisted certificate, an older SDK, an expired token, a development build). Fix it, watch the counts, and turn the switch on again.
- An Android app refused after a Play release: add the Play App signing key certificate (Play Console → App integrity), not only the upload key.
- Google or Apple briefly unreachable: an install proven in the last seven days keeps working while the service is down; only an install never proven has to wait.
- A booked call answered right as a verdict lapsed: the verdict the phone had when it rang carries through the answer, so a ring is never refused mid-way.
Sub-accounts
Each sub-account sets up its own agents, from its own workspace. A parent's Admins who have access to a sub-account can open it from the parent and set it up there, as for any other setting; the parent's Security page lists those sub-accounts with a summary of each. A sub-account's own Admins see only their own. See Secure your workspace.
Error codes
| Code | When | What to do |
|---|---|---|
app_not_allowed | Only my apps is on and this app is not listed, or its SDK is older than 0.14.4 | List the app (and every certificate), or update the SDK |
app_not_verified | Require a verified app is on and this install has no valid proof | Add App Attest / Play Integrity; for a debug build, register its debug token |
identity_unverified | Require verified users is on and the user is not proven | Pass a valid identity token to identify, or refresh it |